Thursday, August 29, 2013

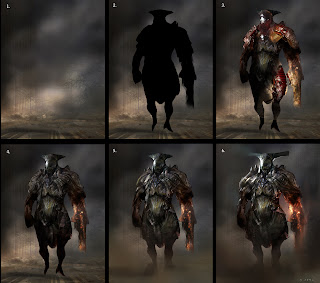
Sunset Mech Process


1. Keeping it limited to warm palette, I painted in the ground and the sky. Used texture brushes and smudged to create some noise.
2. Started sketching in the mech using a hard edge brush at 100% opacity.  My main goal here was to create interesting negative space since if I keep the shape solid it would feel less mechanical..
3. Using the lasso tool I traced the sketch in to a more clean organized shape.  I layer masked the silhouette and did a gradient fill light to dark from top to bottom. Since the gradient fill established the mid value I proceed to indicate the light and shadow using round brush and photo texture (soft light layer)
4. I color dodged where the sun might be and changed the silhouette to show a soldier riding the mech.  I added highlights and glows using color dodge as well.
5. I painted in the stencils and small details. Added some dust. signed my name and Done.

I kept the layers very simple 4 layers all together - background layer, silhouette layer (I link layer mask to keep the painting inside the silhouette), color dodge layer, and dust layer. Hope you guys find this to be helpful.


Friday, April 19, 2013

Orange Robot Sketch


A one hour mech sketch in limited pallette.

Wednesday, April 10, 2013

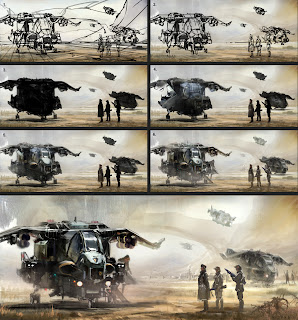
Marines Landing Process


1.Set a rough color tone and sketch a scene. Keep each objects in separate layers, so I have the background sketch, aircraft 1,2,3, and four plus the 3 characters in separate layers. 2. Paint the background using texture brush and lasso background elements from mid-ground. Hard edge on the light side and soft edge on the dark side for interest. 3. Silhouette out the sketches. 4. aircraft - add textures using layer mask. push and push with overlay and color dodge the highlights. Characters - using airbrush set the mid tone. use overlay to push and pull highlight and shadow. add bounce light and make a new layer under the silhouette to hit a very strong rim light. 5. Define shapes and add accent colors and detail lines. Bring in bounce lights. 6. Add atmosphere and soft light layer some textures. and add glows. Done! overall this took me about 3 hours. My composition choice was to have a big shape on the left with the foreground aircraft and I balanced the right side of the frame with smaller objects 3 aircraft and 3 characters (design is more interesting in odd numbers) I connected the 2 groups with the background arch.

Tuesday, March 19, 2013

Creature Design Process


1. Create Background using different texture brushed. Make it lighter around the character for contrast. Use neutral value. 2. Create silhouette in a new layer. I use layer masking to keep my textures inside the silhouette. 3. Add textures to the silhouette. I look for reference pics with good highlight not caring about color. I airbrush the edges to blend the textures. 4. I use color layer to adjust color and I sketch over simple lines to enhance my textures. 5. Use overlay layer to adjust light / shadow. Create a layer of atmosphere and smoke add details to the silhouette. 6. Used liquify to adjust shapes and added the shapes to the head to balance the shapes as it was very bottom heavy. I used color dodge to pop the flame and highlights. Used chalk brush to blend and create soft edges. soft on the light side hard edge on the shadow side. smudged to create motion and done!